Kinshasa is the ninth solo campaign level in Tom Clancy's Splinter Cell: Double Agent (Version 1). Undercover NSA agent Sam Fisher accompanies John Brown's Army (JBA) leader Emile Dufraisne (Version 1) to Kinshasa in the Democratic Republic of Congo for a very vital meeting.
Briefing[]
Emile Dufraisne: You're coming to Kinshasa with me, Fisher. I'll be delivering some weapons to a client there, but the real reason I'm going is that I've got to meet with our partners in this enterprise. The men who are helping us and making it all possible. You remember Massoud, the man, you handed the Rublev over to? He'll be there, so will Allejandro Takfir, who's bankrolling our entire operation. Having the three of us in one place is of course extremely dangerous. That's why securely we'll be very tired and that's why I'm bringing you.
Data & Transcript[]
Information[]
| Assignment | |||
|---|---|---|---|
| 12:06 | NSA | Bug the secret meeting room. | It is desperately important that we know the content of Emile's meeting with the other terrorist leaders. Plant a miniature microphone in one of the plants of the meeting room, so that the information can be communicated and we can make appropriate preparations. Avoid detection by Emile at all costs: if he notices you in the meeting room, your cover will be blown for sure. |
| JBA | Return to parking lot. | Emile is on his way back to the parking lot. You have to reach it before he does, or he will be suspicious of your activities inside the hotel. | |
| 14:03 | JBA | Find CIA agent Hisham Hamza. | You must locate Hisham Hamza. With the terrorist groups hunting for him, it is imperative that you find him first. |
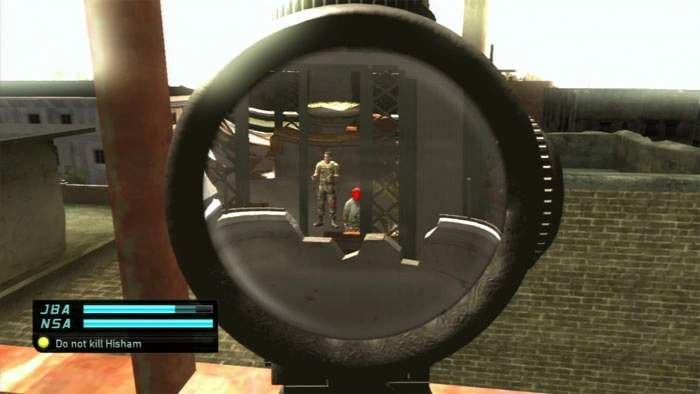
| 17:12 | NSA | Rescue Hisham. | Hisham Hamza is a prisoner of the rebel forces who have overtaken the Presidential Palace, located on the other side of the battle zone from the radio tower. Infiltrate the palace, and help Hisham escape from his captors. Be careful; the rebels are on edge, and if you trigger an alarm, they might begin to execute prisoners. |
| NSA | Help Hisham escape. | Despite your orders from Emile, Hisham Hamza is a valuable asset who must be kept alive. Do what you must to help Hamza escape. Escort him to the fence near the docks, so he can regroup with CIA assets on the ground. The fence is near your rendezvous point with Emile. | |
| NSA | Reach fence to extract. | You let Hisham Hamza die. Regroup with Emile, at the fence near the docks. [Hisham Hamsa is killed] | |
| Primary Objectives | |||
| 14:03 | NSA | Retrieve plans from the camp. | If possible, infiltrate the Presidential Forces camp and take their operational plans. Do this while avoiding attention if you can, as the camp is crawling with soldiers. [Timer 00:15] |
| Secondary Objectives | |||
| 12:06 | NSA | ★ Avoid all alerts. | The terrorists are using a secure room at the top of the hotel for their meeting. However, it shouldn't be secure enough to keep you out. Find a way to infiltrate it without triggering an alert, or they may choose to use another site. |
| 14:03 | NSA | Prevent the execution. | If possible, you should prevent civilian casualties. The Rebels will execute three civilians. You should stop them if possible. [Use wall mines to lure out and destroy two rebels] |
| NSA | Save woman on the bus. | If possible, you should prevent civilian casualties. A woman is trapped inside the bus; you should try and reach her, and free her if you can. | |
| Choices Objectives | |||
| 14:03 | JBA | Kill Hisham. | Hisham Hamza has been identified as an embedded CIA operative in Massoud's group. Emile Dufraisne has ordered you to kill him, a move that would fortify your cover within the JBA. |
| NSA | Do not kill Hisham. | Hisham Hamza has been identified as an embedded CIA operative in Massoud's group. Emile Dufraisne has ordered you to kill him, but doing so would deprive the NSA and the CIA of critical information that could lead to the prevention of massive terrorist attacks. | |
| Notes | |||
| 12:06 | ❌ [Unavailable] The code to the hatch to the meeting room is hacked. | ||
| 14:03 | 💻 [Notebook] Look out for mines in the streets of the city. | ||
| 💻 [Notebook] The radio tower offers a good vantage point on the presidential palace. | |||
| Pick Lock | |||
| 12:06 | 🔑 [Hotel Roof] 4-pins: → ↑ → ↑ | ||
| 14:03 | 🔑 [Exit From Parking Lot] 2-pins: → ← | ||
| Lost data, missed in mission | |||
| 12:06 | NSA | Lower the water in the meeting room. Initially, the ceiling in the meeting room was separated by a glass aquarium filled with water. It must have been used here Glass Cutter. | |
| JBA | Emile waiting for Sam in parking. If Sam didn't get to the parking lot on time, Emile called him and JBA's trust began to decline, and this task had to be highlighted. | ||
Overview[]
Sam Fisher arrived in Kinsasha in the parking lot of the meeting building in the back of a general purpose military truck. Emile tells Fisher to wait in the truck until he meets with Allejandro Takfir and Massoud Ibn-Yussif, he'll return to give him his orders. After leaving, Central Intelligence Agency informant Hisham Hamza contacts Fisher and asks him to record that meeting. Fisher complied and hopped out of the back of the truck and heads out of the parking garage. Fisher was able to get through the kitchen area and cafeteria, climbing onto the hotel building where he was able to ascend to the rooftops.
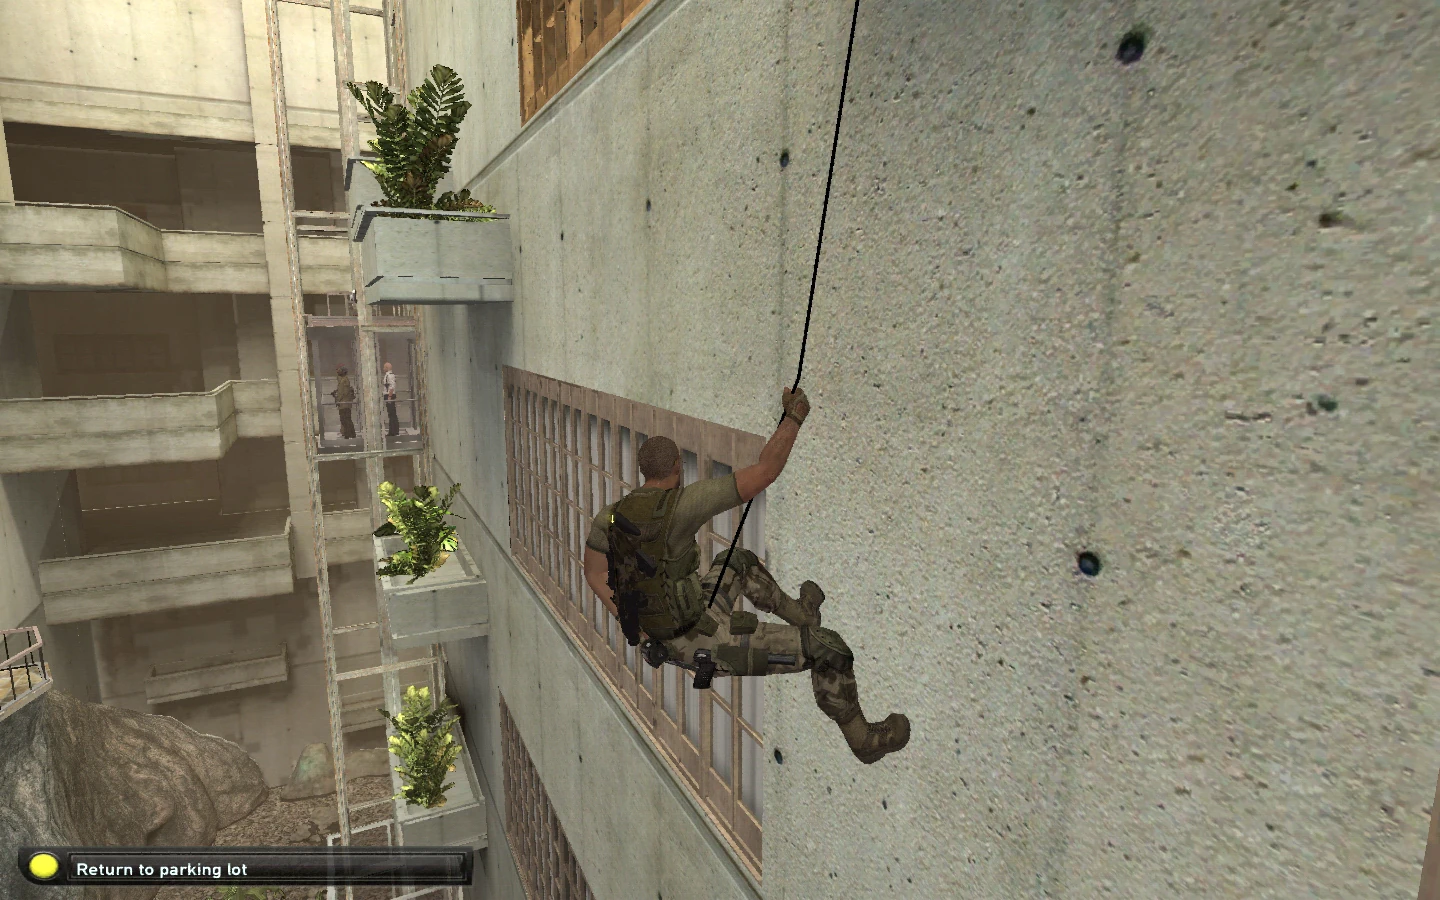
Fisher scales the side of the hotel as he attempts to beat Emile Dufraisne back to the garage/parking lot.
Fisher found a way to make it to the secured meeting room where Takfir, Massoud and Emile were going to meet. First, Fisher had to time his movements and slip past the laser security system where he was able to rappel himself from the center of the room and bug the center table of the room. Shortly, the three men enter the room and begin their conversation as Fisher was able to conceal himself on top of the lights. After the conversation, Fisher had to race against time and arrive back at the parking garage before Emile returned to the truck.
Fisher uses the Barret M82A1 to snipe the presidential guard before he kills Hisham.
Fisher was able to make it to the truck and Emile soon arrives, giving him his next assignment. Emile orders Fisher to kill a CIA mole, Hisham Hamza, who is located in the Congolese Presidential Palace. Fisher is to make his way to the nearby radio tower and take out Hisham using a sniper rifle positioned and set up on the tower. Fisher leaves the parking garage and navigates through the firefights between rebel soldiers and presidential soldiers fighting in the streets. Along the way, rebel soldiers had been executing and holding civilians hostage during the chaos for them to be killed. Fisher finally arrives at the radio and takes a sniper position using the Barrett M82A1 to oversee the window, he finds Hisham trying to reason with a presidential guard in the Presidential Palace. Fisher saves Hisham by taking out the presidential guard.

Fisher speaks to Hisham as he rescues him from the hostiles controlling the presidential palace.
A helicopter suddenly arrives, damaged and spinning out of the sky, knocking part of the tower over, which causes Fisher to fall down. Fisher then zip lines down the cable wire and into a destroyed building below. Fisher then navigated his way through the wreckage as rebel soldiers and presidential officers fire at the each other through the decimated streets. Fisher arrived at the Presidential Palace where Hisham was held hostage and rescued him from the rebel soldiers, all the while effectively faking his death by destroying the building after escaping. Fisher is then extracted by the JBA and heads back to the JBA Headquarters.
Trivia[]
- In this mission, since it's a daytime mission, Fisher is not given his signature Multi-Vision Goggles. Instead, Fisher wears a pair of aviator shades that he can 'activate' and 'deactivate' similar to the way his goggles work. When activated, they will darken the environment making it easier to see for the player.
- If the player chooses to shoot and kill Hisham, the mission ends and will not have access to the extra sections of the mission where Fisher attempts to rescue Hisham from the palace guards.
- The explosive mines the player manufactured for Enrica Villablanca in the second JBA HQ mission can be seen in one of the sections, blowing up one of the rebels. The players then have to navigate a safe path past the mines.
- In the second part of the level, if the player turns on the radar (Z button) and quickload his last save, the game will crash. To avoid crashing, turn off your radar and continue the level. (PC)
- There this only one way to save civilians without lost any % stealth by using Wall Mines on the wall and attract enemies by whistle.
- The mission is divided into three parts. When Hisham murder from the tower the third part of the mission is passed.
[]
| ||||||||||||||||||||||||||